
Everything to Know About Convolutional Neural Networks

Convolutional Neural Networks
Photo by Clint Adair on Unsplash

"From a computer vision point of view, there's no doubt that deep convolutional neural networks are today's "master algorithm" for dealing with perceptual data." 
 - Tomasz Malisiewicz

Nowadays, we all must have seen and used various effects and filters on images and how our computers and smartphones detect and recognize faces in photographs and videos. These all things are possible by "computer vision" which is nothing but machine learning using convolutional neural networks.

Computer vision is similar to human vision, it helps the system to recognize, classify, detect complex features in data. Some of its applications can be seen in self-driving cars, vision for robots, facial recognition.

But this computer vision is not completely the same as our human vision, unlike us the computer sees the image in the form of a matrix of pixels.

An image is made up of pixels. And each pixel value can take a value from 0 to 255.

What is a convolutional neural network

A convolutional neural network or CNN is a kind of neural network that is used in processing data with input shape in 2D matrix form like images.

The structure of a convolutional neural network is a feed-forward with several hidden layers in the sequence mainly convolution and pooling layers followed by activation layers. With this CNN model, we can recognize handwritten letters and human faces (depending on the number of layers and complexity of the image).

Convolutional neural network model
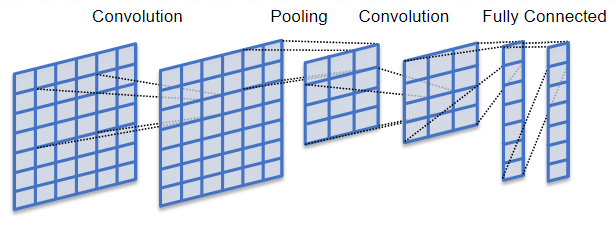
(Image by Wikimedia Commons) Convolutional neural network model

In this article, we will learn concepts of CNN and build an image classifier model for a better grasp of the subject.

Before building the model we need to understand and learn few important concepts of convolutional neural networks.

  • As we already know, computers view images as numbers in the form of a matrix of pixels. CNN views images as three-dimensional objects where height and width are the first two dimensions and color encoding is the third dimension (for example, 3x3x3 RGB images).

Now just imagine, how computationally intensive it will be to process a 4K image (3840 x 2160 pixel).

Convolution

  • So the main objective of convolutional networks is to reduce the images into the form which is easier to process while preserving the features and maintaining a good accuracy while predicting.
There are three main significant units in convolutional neural networks i.e. input image, feature detector, and feature map.
  • A feature detector is a kernel of filter (a matrix of numbers, usually 3x3). Here the idea is to multiply the matrix representation of images, element-wise with the kernel to get a feature map. In this step, the size of the image is reduced for faster and simpler processing. Important features of the image are retained (like features that are unique to the image/object i.e. necessary for the recognition). However, some features are lost in this step.
  • For example, if we have an input image of 5x5x1 dimensions and the convolution kernel/filter we apply to an image is of 3x3x1 dimension:
Image matrix:
1 1 0 1 1
1 0 1 0 1
1 1 1 1 0
0 0 1 1 0
1 1 0 0 0

Kernel matrix:
1 0 1
0 1 0
1 1 0

Then the convolved feature obtained after the multiplication of kernel matrix with each element of image matrix will be:

Convolved matrix:
3  5  3
3  2  5
4  4  2

Here, kernel shifts 9 times because stride length is 1 (i.e. filter will slide after each element of image matrix). 

ReLu activation function

The purpose of applying this ReLu function (rectified linear unit) is to increase nonlinearity in the model. Since the image/object has several features that are not linear to each other. We apply this function so that our model does not treat image classification as a linear problem.

Pooling layer 

The pooling layer is similar to the convolutional layer, and it is responsible for the reduction of the size of the convolved matrix.
Pooling layer — feature map
(Image by Wikimedia Commons) Pooling layer — feature map

It is an important step in the process of a convolutional neural network. Pooling is essential for detecting and extracting prominent features from images irrespective of different positions, angles, different lighting, etc. while maintaining the accuracy and efficiency of the training model.

Furthermore, as the size of the image data is reduced (while preserving the dominant features), the computational power required to process the data is also decreased. 

There are different types of pooling: max pooling, min pooling, and average pooling.
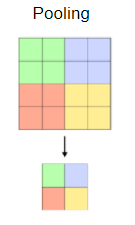
  • Max pooling extracts the maximum value from the portion of the feature map matrix covered by the kernel (specific pool size like 2x2). 
  • Min pooling extracts the minimum value from the portion of the feature map matrix covered by the kernel (specific pool size like 2x2).
  • While average pooling average of all values is selected from the portion of the feature map matrix covered by the kernel (specific pool size like 2x2).
Max pooling is the most efficient of all the pooling methods (since it will contain the most dominant features of the convolutional feature map).

Convolved matrix:
3 5 4 1
2 2 5 6
4 4 2 5
1 3 5 4

Max pooled matrix:
5 6
4 5

Min pooled matrix:
2 1
1 2

Average pooled matrix:
3 4
3 4

Above these are the pooled feature maps.

The number of these convolution and pooling layers can be increased or decreased depending on the complexity of the input image and the level of details and features that has to be extracted. But remember the number of layer you increase in the model, the computational power required will also increase.

With these convolution and pooling layers, our model can understand extract the feature of the image.

Flattening

The next step is to flatten the pool feature map obtained i.e. transforming the multidimensional pool feature map matrix to a single dimension array (linear vector or column) to feed it to the neural network for processing and classification.

Full connection layer - Classification

After we have obtained our data in the form of a column vector, we will pass it through the feed-forward neural network, where the backpropagation is implemented over every iteration during the process of training (accuracy of prediction is improved).

After several epochs of training, our model will be able to recognize and distinguish between prominent and low-level features of the image.

The final output values obtained from the neural network may not sum up to one, but it is necessary to bring these values between zero and one. This will represent the probability of each class and further, classify them for the output using the softmax technique (activation function used for multi-class classification).

Implementation of CNN using MNIST dataset

In this article, we will be using the MNIST dataset i.e. a dataset of 70,000 (60,000 training images and 10,000 test images) small square 28×28 pixel grayscale images of handwritten single digits between 0 and 9.

Here the objective of our model is to classify a given set of images of handwritten digits into 1 to 10 (representing integers from 0 to 9).

We will be using Keras and matplotlib library in this article.

The code below will load the first nine images of the MNIST dataset using Keras API and plot them using the matplotlib library.

from keras.utils import to_categorical
from keras.models import Sequential
from keras.layers import Conv2D
from keras.layers import MaxPooling2D
from keras.layers import Dense
from keras.layers import Flatten
from keras.optimizers import SGD
from keras.datasets import mnist
from matplotlib import pyplot

# load dataset
(trainX, trainy), (testX, testy) = mnist.load_data()
# plot first 9 images
for i in range(9):
 pyplot.subplot(330 + 1 + i)
 pyplot.imshow(trainX[i], cmap=pyplot.get_cmap('gray'))
pyplot.show()

Training and testing images (that are already well defined by the model) are loaded separately as shown in the code above.
handwritten digits images in MNIST dataset
(Image by Author) The first nine handwritten digits images in the MNIST dataset
Now we will load the complete dataset and pre-process the data before feeding it to the neural network.

(trainX, trainY), (testX, testY) = mnist.load_data()
trainX = trainX.reshape((trainX.shape[0], 28, 28, 1))
testX = testX.reshape((testX.shape[0], 28, 28, 1))
trainY = to_categorical(trainY)
testY = to_categorical(testY)

In the above, code we have reshaped the data to have a single color channel (since the images are of the same 28x28 pixel and greyscale form). 

Further, we have one hot encoded dataset values (using to_categorical, a Keras function) because we know there are ten distinct classes that all are represented by unique integers. Here each integer sample is transformed into a ten element binary vector with a one for the index of the class value, and zero values for all other classes.

After doing this, we will have to normalize our dataset as we know that the pixel value of images varies between 0 and 255 (black and white). For doing this we scale this data into the range of [0,1].
 
trainX = trainX.astype('float32')
testX = testX.astype('float32')
trainX = trainX / 255.0
testX = testX / 255.0

In the above code, we have first converted the integral values of pixel to floats. After that, we have divided those values by the maximum number (i.e. 255) so that all the values will be scaled in the range of [0,1].

Now we will start building our neural network.

 model = Sequential()
 model.add(Conv2D(32, (3, 3), activation='relu',  
 kernel_initializer='he_uniform', input_shape=(28, 28, 1)))
 model.add(MaxPooling2D((2, 2)))
 model.add(Flatten())
 model.add(Dense(100, activation='relu',   
 kernel_initializer='he_uniform'))
 model.add(Dense(10, activation='softmax'))
 opt = SGD(lr=0.01, momentum=0.9)
 model.compile(optimizer=opt, loss='categorical_crossentropy',metrics=['accuracy'])

In the above code, we have used Keras API sequentaial() that is used to create a model layer by layer. After that, we have added a single convolution layer for our model with a kernel size of (3x3) with 32 filters. It is followed by a single MaxPooling() layer of the kernel size (2x2). Then the output feature map is flattened.

As we know that there are 10 classes, so there will be 10 nodes required in the output layer for the prediction of each class (multi-class classification) along with the softmax activation function. Between the feature extractor layers and output layer, we have added a dense layer with 100 nodes for feature analysis and interpretation by the model.

Stochastic gradient descent(with a learning rate of 0.01 and momentum of 0.9) optimizer and categorical_crossentropy loss function is used in the model (suitable for multi-class classification models).


Finally, after compiling our model, it needs to be trained on the training dataset and tested on the testing dataset, and further to evaluate its results (i.e. accuracy and loss).

batch_size = 128
num_epoch = 10
#model training
model_log = model.fit(trainX, trainY,
          batch_size=batch_size,
          epochs=num_epoch,
          verbose=1,
          validation_data=(testX, testY))

In the above code, we have used 10 epochs with a batch_size of 128 (batch size is the number of samples trained in one iteration).The above results can be evaluated in terms of performance:

score = model.evaluate(testX, testY, verbose=0)
print('Test loss:', score[0]) 
print('Test accuracy:', score[1])

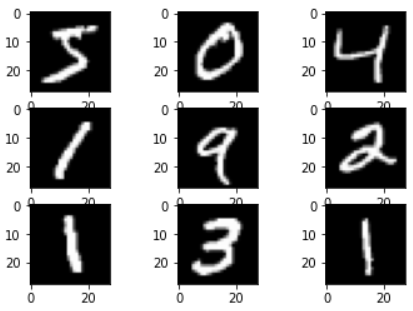
With a test accuracy >98% we can say that our model is trained well for accurate prediction. You can also visualize these results using the matplotlib library!

Conclusion

I hope with this article you will be able to understand and grasp the concepts of convolutional neural networks.

For a better understanding of these concepts, I will recommend you try writing these codes on your once. Keep exploring, and I am sure you will discover new features along the way. 

If you have any questions or comments, please post them in the comment section.

Comments

  1. This comment has been removed by the author.

    ReplyDelete
  2. Thank you so much for sharing these amazing tips. I must say you are an unbelievable writer, I like the way that you describe things. Please keep sharing.
    Generation of Programming Languages
    Basics of Programming Language For Beginners
    How To Learn app programming and Launch Your App in 3 Months
    Learn Basics of Python For Machine Learning

    ReplyDelete
  3. I really appreciate you saying it’s an interesting post to read. I learn new information from your blog, you are doing a great job. Thank you for sharing meaningful information

    Get Genuine Experience Certificate with Reasonable Cost
    Want Fill Your Career GAP ! Call Us & Get Genuine Experience Certificate

    ReplyDelete


  4. Hi dear,

    Thank you for this wonderful post. It is very informative and useful. I would like to share something here too.Abbiamo molte possibilitĂ  per il tuo successo professionale. Partecipa ai nostri corsi di formazione online, Partecipa ai nostri corsi di recupero online. Iniziare a imparare gratuitamente con un'ampia gamma di corsi online gratuiti che coprono diverse materie. Corsi online gratuiti per raggiungere i tuoi obiettivi, forniamo anche lezioni di recupero per gli student.


    Corsi di Recupero


    ReplyDelete

  5. Hi dear,

    Thank you for this wonderful post. It is very informative and useful. I would like to share something here too.Our highly professional team provide complete IT solutions that specializes in custom mobile and web application development. Call us at (+91) 9001721837.


    cms development company india

    ReplyDelete
  6. Hi dear,

    Thank you for this wonderful post. It is very informative and useful. I would like to share something here too.Loop of Words is an innovative digital marketing agency dedicated to enhancing your brand’s image and customer base. The latest tools, powerful strategies, and data-driven results are our power pillars to deliver the best results.


    https://loopofwords.in/website-development/>custom web development services

    ReplyDelete
  7. Data Science Course in Delhi
    https://onlinecoursesdelhi.educatorpages.com/pages/data-science-course-in-delhi
    Best Data Science training institute in Delhi helpful to improve your skills and bright future. APTRON Delhi is Good training institute for Data Science course in Delhi. All sessions are practical and based on real-time scenario.

    ReplyDelete
  8. Your blog rocks! I just wanted to say that your blog is awesome. It’s really helped me to chose ms in machine learning usa.

    ReplyDelete

Post a Comment

Popular posts from this blog

Everything You Need to Know About Google Foobar Challenge

Recently, while searching a keyword “headless chrome” on Google I got an unusual pop-up on my window, with a message: "Curious developers are known to seek interesting problems. Solve one from Google?" I was surprised to see Google sending me a challenge to solve and I accepted it immediately! Clicking on “I want to play” landed me on Google’s Foobar page. It was Google Foobar Challenge! What exactly is Google Foobar Challenge? Google Foobar challenge is a secret hiring process by the company to recruit top programmers and developers around the world. And it is known that several developers at Google are hired by this process. The challenge consists of five levels with a total of nine questions , with the level of difficulty increasing at each level. What to do after getting the challenge? After selecting “I want to play” option you land on Foobar’s website which has a Unix-like shell interface, including some standard Unix commands like help, cd, ls, cat and etcetera .

9 Techniques to Write Your Code Efficiently

(Photo by Oskar Yildiz on Unsplash ) It’s really easy to write efficient and faster code . Efficient code, not just only improves the functionality of the code but it can also reduce the time and space complexity of the programming. Speed is one of the major factors in deciding the quality of the code , for instance, your code might be producing the required result but it takes some time to execute then it will not be considered a quality code. An alternative approach to the same problem producing faster results will be considered better. The code should be clean i.e. comprehensible and readable so that it can be reused (saving the efforts of rewriting the whole program from scratch), adding new features, and making the process of debugging more easier. In this article, I will cover some simple tips and techniques which we can easily apply to make our code more elegant and efficient. "There is always more than one method to solve the problem." How to write code efficie

Complete Data Visualization Guide: Python

“A picture is worth a thousand words” -Fred R. Barnard  Data visualization is a visual (or graphic) representation of data to find useful insights (i.e. trends and patterns) in the data and making the process of data analysis easier and simpler. Aim of the data visualization is to make a quick and clear understanding of data in the first glance and make it visually presentable to comprehend the information. In Python, several comprehensive libraries are available for creating high quality, attractive, interactive, and informative statistical graphics (2D and 3D).

Followers